Working with Workspaces in Premiere Pro

Managing and Troubleshooting Premiere Pro Workspaces
One of Premiere Pro's greatest strengths is its fully customizable interface. Workspaces give video editors the freedom and flexibility to arrange Premiere Pro's layout to accommodate their editing workflow. It's important to understand the inner workings of workspaces if you want to work faster in Premiere Pro.
There has been some odd workspace behavior in Premiere Pro CC 2017. Some users have noticed clicking on the Titles workspaces does absolutely nothing. Other users can't find the default Graphics workspace.
This in-depth blog post will help editors understand how to manage Premiere Pro workspaces and troubleshoot unresponsive or missing workspaces. But first, a quick overview of workspaces and how to edit them.
What are Workspaces?
The Premiere Pro interface is made up of panels that are organized into a layout, and saved as a workspace. Premiere Pro comes with 9 factory-default workspaces: Assembly, Editing, Color, Effects, Audio, Libraries, Graphics, All Panels, and Metalogging. You can see by their names that Adobe has arranged the default workspaces by specific post-production tasks. Not a bad strategy for customizing your own Premiere Pro workspaces.
Learn more about Premiere Pro workspaces.
Editing Workspaces
The list of all the panels in Premiere Pro (including extensions) can be found under the Window menu. If you've accidentally closed a panel, the Window menu is where you can find it. All of these panels can live in the interface wherever you want to put them. Click and drag a panel tab to dock it, or add it to a panel group indicated by the purple drop zones.

Once you are happy with the way your panels are organized, save the layout as a workspace by clicking the hamburger menu next to the active workspace, and choose "Save as New Workspace". If you would like to keep layout changes as part of the existing workspace, choose "Save Changes to this Workspace". If you moved or closed a panel temporarily or by accident, choose "Reset to Save Layout" to restore your workspace.

You can also customize the Workspace bar. Click the double chevrons on the right side and choose "Edit Workspaces..." In the Edit Workspaces window you can arrange how workspaces are ordered, which workspaces are in the overflow menu, and which workspaces should not be shown. This is also where you can delete custom workspaces.

Click here to learn more about customizing workspaces in Premiere Pro.
Import Workspace From Project
By default, Premiere Pro opens projects in the current workspace. However, you import the workspace that was used for a specific project. One would assume this feature is under Preferences, but it's actually under the Window > Workspaces menu. This feature must be on before opening the project in order to work. Import Workspace from Project might be convenient if you're familiar with the specific project workspace. It may not be desirable if you're importing someone else's project.

Where Are Premiere Pro Workspace Files Saved?
Premiere Pro Workspaces are XML files stored on your system in the "Layouts" folder. On the Mac, the Layouts folder can be found here:
Documents > Adobe > Premiere Pro > 11.0 > Layouts

NOTE: 11.0 is Premiere Pro CC 2017. You may have other numbered folders depending on which version(s) of Premiere Pro CC are installed on your machine.
How are Workspace Files Created?
You would think there would be an XML file for each default workspace right out of the box. That's not the case. The XMLs files are created the first time you select a workspace.
This makes sense if you think about it. When you choose a workspace for the first time, Premiere Pro automatically creates an XML file in case you change the workspace. This prevents a default workspace from being overwritten, and it also enables current workspace layouts to travel with the Premiere Pro project file.
Why You Can't Rename Workspace Files
Premiere Pro names the workspace XML files "UserWorkspace" followed by a number. Pretty boring. Why can't you rename this to, say, the name of your workspace in Premiere Pro? You can. But Premiere Pro is going to revert back to the UserWorkspaceX naming structure, and create a new file for the workspace. So, unfortunately, there's no way to customize the names of the workspace xml files.

Reset to Default Premiere Pro Workspaces
Premiere Pro workspaces can act funky sometimes as stated at the beginning of the blog post. Resetting them is a great way to troubleshoot unresponsive or missing workspaces. Or, perhaps you've gone workspace crazy and want a clean start. To restore the workspaces in Premiere Pro to their original configurations, rename the Layouts folder to something else - anything you want. Premiere Pro will automatically generate a new Layouts folder at startup if it doesn't detect an existing one.

The new Layouts folder will reset all the default workspaces to their original configurations. No custom workspaces will appear in Premiere Pro. (Don't panic, your beautiful custom workspaces are still in the folder you renamed.)
Find Custom Premiere Pro Workspace Files
Getting your custom workspaces back in Premiere Pro is as easy as copying the XML files to the new Layouts folder. The question is, which XML files are your custom workspaces? We already established that renaming the UserWorkspace XML files doesn't work. How do you know which file to copy over?
Here's the trick. Open any of the UserWorkspace XML files with a text editor (TextEdit on the Mac) and search for "username". This should produce one result:
<key>UserName</key>
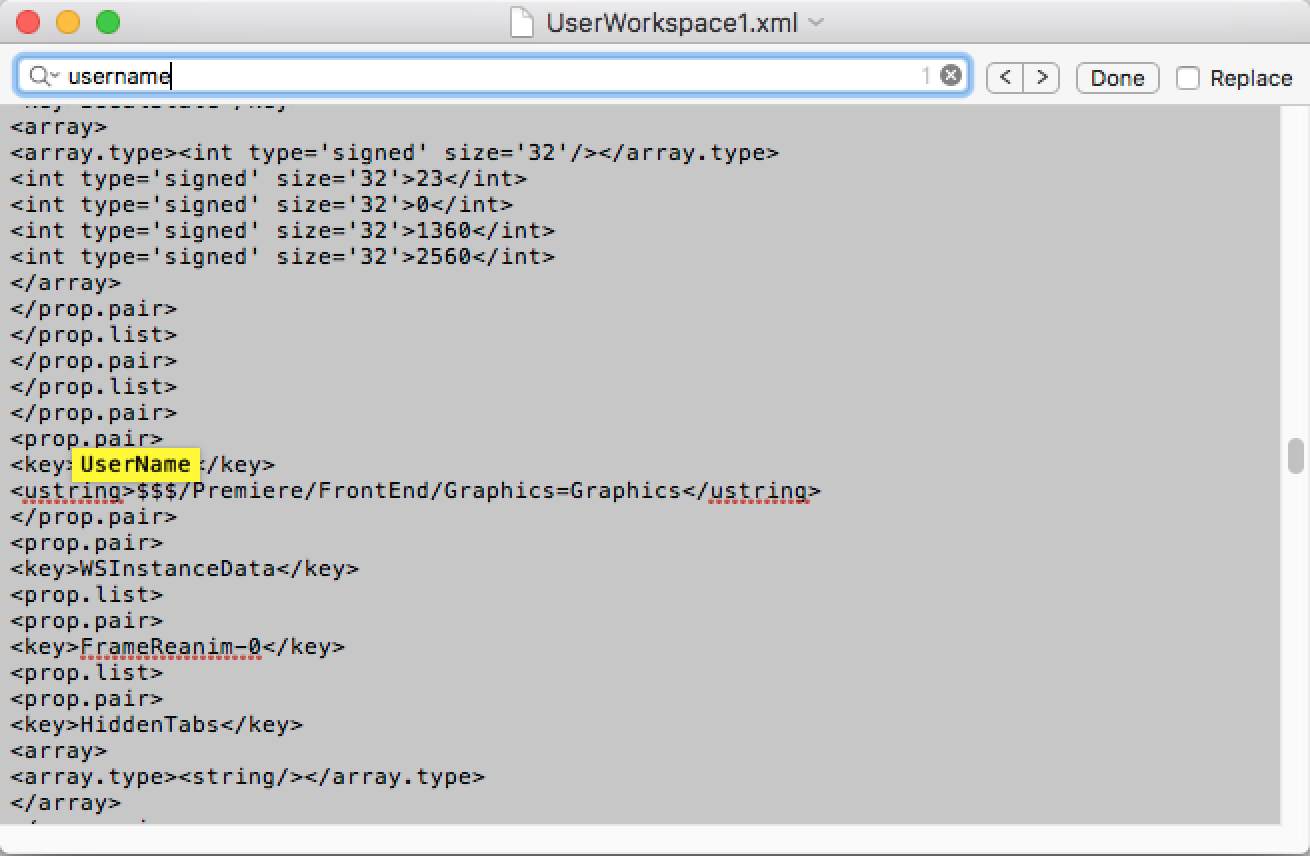
You could just search for the workspace name, but I recommend "username" because it's a single, constant instance in all workspace XML files. Below the UserName line you should see the workspace name:
<ustring>$$$/Premiere/FrontEnd/Graphics=Graphics</ustring>
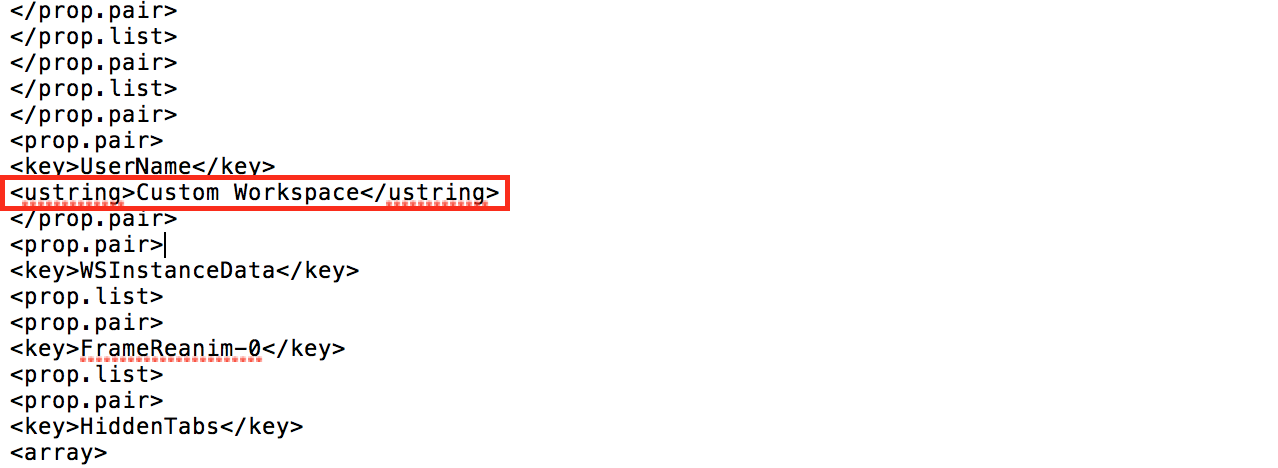
The bolded text above is the name for the default Graphics workspace. All the other default workspaces will have the same naming pattern. Here is what a custom workspace name will look like:
<ustring>Custom Workspace</ustring>
All you have to do is search the XML files with TextEdit to find your custom workspaces. Then you can copy them to the new Layouts folder, and they will appear after restarting Premiere Pro.
NOTE: You may have to rename your custom workspace to a different number before copying it to the Layouts folder. This will prevent overwriting another workspace.
Sync Workspaces to Creative Cloud
Since we're talking about workspaces, now's a good time to make sure you're syncing your workspaces to your Creative Cloud account. Under Preferences > Sync Settings, make sure the Workspace Layouts box is checked. Click here to learn more about Sync Settings with Adobe Creative Cloud.


I know this blog post is hardly an exciting topic. Hopefully it triggered some fellow Premiere Pro geeks out there. If you have any additional insights on Premiere Pro workspaces, please post them in the comments below. Feel free to fact check me and let me know what you find.