3 Ways to Optimize Premiere Pro's Performance

How to Get the Best Premiere Pro Performance out of your System, Preferences, and Playback Settings.
It's frustrating when you're trying to edit and playback in Premiere Pro is laggy and unresponsive. Throw in a client deadline and it's the absolute worst! In this tutorial, featuring Ian Sansavera of Learn How to Edit Stuff, there are three ways to optimize Premiere Pro: system updates, preferences, and playback. Watch the tutorial below or follow our guide with each optimization tip broken down into its own segment.

Sep 2, 2018 — Optimize Adobe Premiere For Best Performance! Laggy? Slow? Crashing? Hard to deal with? It's time to optimize your computer AND Premiere for best performance! In this video, I'll show you how! —Learn How To Edit Stuff
1. Update your computer software
It's easy to blame Premiere Pro for poor performance, but, the fact is, it may not have anything to do with Premiere Pro.
The first thing Ian recommends doing to improve Premiere Pro's performance actually has nothing to do with Premiere Pro. Check for system updates. Obviously, this means different things for Mac and PC users. In this particular tutorial, Ian is using a PC. Watch the video segment below to follow Ian's system updates checklist.

Via Learn How to Edit Stuff
The Computer-Machine Analogy
It should be no surprise that Premiere Pro's performance depends on your computer hardware: CPU, GPU, RAM, storage, etc. Together, these are literally the machinery that make Premiere Pro and every other application run. Some computer components require their own software to work—like oil in an engine. Everyone knows you have to change the oil from time to time for any engine to run smoothly. Keeping your computer system's software up-to-date is like keeping your oil fresh and your machine running smoothly.
WARNING — DO NOT UPDATE YOUR SYSTEM SOFTWARE IN THE MIDDLE OF AN EDITING PROJECT!
Computer configurations vary wildly, especially for PC users. So, Ian's hardware is probably different than yours. That's OK, the idea is still the same! You just need to identify the manufacturer of your hardware and search their sites for updates or a proprietary update management program. Below are the specific updates that Ian checks for in his video:
Update Windows - Tap the Windows key > search 'update' > Check for updates.
Update Graphics Card (Nvidia GeForce) - Download GeForce Experience app > Drivers tab > download update if available.
Motherboard and Bios (MSI motherboard) - Use MSI Live Update to check for missing drivers and updates.
Finally, Ian recommends a Google search of your computer make and model to see what specific components may require updates.

Puget Systems
If you are looking for further guidance on updating your PC, we highly recommend our computer partner, Puget Systems. They are America's number one computer builder and they offer customized workstations for Premiere Pro. Check out their extensive library of free Premiere Pro resources and benchmarks.
2. Premiere Pro Preferences
After everything outside Premiere Pro is up-to-date, we can go inside and customize Premiere Pro's preferences for better performance. In the video segment below, Ian goes through every tab in the Preferences window, giving his recommended settings. Some of his suggestions are more applicable to workflow efficiency rather than performance. So, we've pulled out the 4 performance-specific preferences below for your convenience.
Media
Turn off Automatically refresh growing files. In this segment, Ian claims turning off this preference had a significant improvement on his performance in Premiere Pro.

What are growing files? This setting is intended for a specific workflow that is not applicable to most Premiere Pro users. When this setting is turned on, Premiere Pro is automatically refreshing the duration of growing video files. Support for growing files is only for the following MXF-wrapped codecs:
- AVC-Intra Class 50/100
- IMX 30/40/50
- XDCAM HD 50/35/25/18 RDD9
If you're not using these formats, then you don't need Automatically Refresh Growing Files turned on. You don't need Premiere Pro trying to refresh growing files that don't exist. How much performance does this actually save? Not sure. But it makes sense to turn off any uneccessary tasks. Learn more about growing files in Premiere Pro.
Media Cache
Whenever you import media into Premiere Pro, it automatically generates several types of files and caches them to make playback easier for itself. It's important to manage these cached files for optimal performance in Premiere Pro. In this segment, Ian goes over his Media Cache settings, where you should save your cache files, and how often you should them.

There are two things Ian recommends for managing cache files:
1. Save cache files to a separate drive from your operating drive and, preferably, your project drive. The faster the drive, the better. Premiere Pro is constantly referencing media files and cache files. It's best practice to separate these tasks to different drives when possible. Users can set the location of the media cache under the Media Cache preferences. Read Adobe's recommendations for moving and cleaning the Media Cache Database.
2. Clean media cache files in between editing projects. If left unchecked, media cache files can start to eat up significant storage space. Unused cache files can be manually deleted by pressing the Delete Unused button under the Media Cache preferences. Premiere Pro also allows users to automatically manage their cache files. In the Media Cache preferences, users can choose to automatically delete media cache files after a specific time or when the cache exceeds a specific folder size. Deleting media cache files for current editing projects will not delete your original media. Missing media cache files will automatically be recreated if Premiere Pro needs them.
Memory
Adobe applications share the same pool of system memory. Premiere Pro allows users to allocate how memory is available to it. In this segment, Ian recommends increasing this to the max, giving Premiere Pro the highest priority for memory. The exact amount will depend on how much RAM is installed on your computer.

Ian also recommends switching Optimize rendering for Performance instead of Memory. NOTE: If you get a Low Memory Warning while rendering, switch back to Memory. Learn more about optimizing memory in Premiere Pro.
It's important to point out that Ian's suggestion of maximizing memory for Premiere Pro may have a negative effect on After Effects when both applications are running simultaneously. Obviously, Adobe has engineered After Effect and Premiere Pro to be used in tandem with the Dynamic Link workflow. If you adjust your memory preferences, you may want to close Premiere Pro when switching to After Effects and vice-versa.
Playback
Uncheck Enable Mercury Transmit. Mercury Transmit is a video signal that's identical to what's seen in the Program monitor. Don't worry, this doesn't have anything to do with using multiple displays. This is specifically for viewing your edit on an external monitor or TV. If you're not using an external monitor/TV, then there's no reason to have this enabled. We don't want to make Premiere Pro work any hard than it has to.
Another simple performance tip that Ian doesn't recommend is turning on Pause Media Encoder queue during playback (shown in the image above). This is usually on by default, but it doesn't hurt to check. It's amazing that Premiere Pro allows users to continue editing while Media Encoder is working. But the simple truth is it's a huge resource hog on your system. Checking this preference will automatically pause Media Encoder whenever you hit play in Premiere Pro. Encoding will resume once playback in Premiere Pro stops.
Optimize Playback in Premiere Pro
The last part of the video is the shortest and it focuses on several features in Premiere Pro that can improve playback performance. Watch the segment below to learn Ian's 3 tips for optimizing playback in Premiere Pro. (No, proxies is not one of them.)

1. Match Sequence Settings to Footage
The ability to playback multiple formats natively is one of Premiere Pro's greatest strengths compared to other NLEs. Depending on your system hardware, it can do this very well. But the fact is, if you're footage is all the same format, you can make things easier for Premiere Pro by matching your sequence settings to your footage, particularly resolution and frame rate.
However, it's common to work with many types of media formats. In this case, the best thing you can do is is match your sequence settings to the most common footage settings.
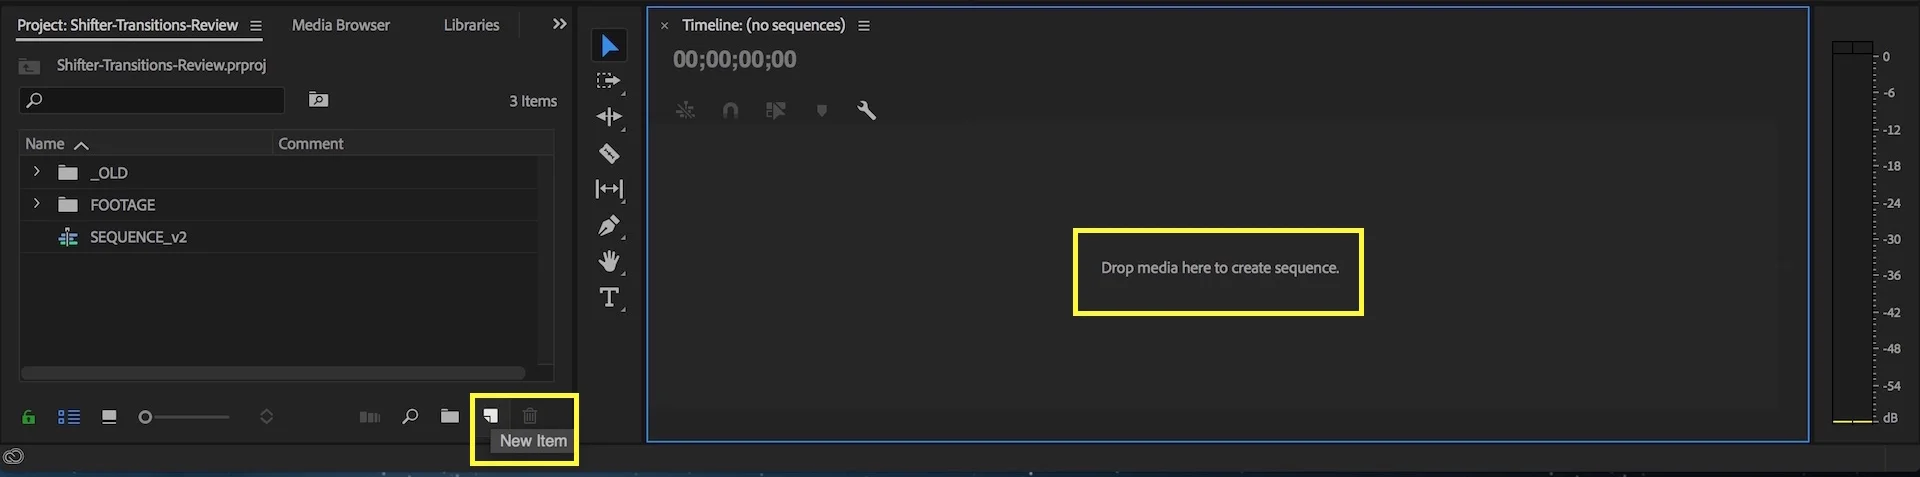
The easiest way to ensure your sequence settings match your footage is to drop one of your clips on an empty Timeline panel or on the New Item button in the bottom right of the Project panel. This will automatically create a new sequence based on your source settings.
2. Render Previews
Have you ever wondered what the yellow, red, and green colors above the Timeline mean? Those are render bars and they indicate how likely Premiere Pro will playback those areas in realtime. Yellow means realtime playback is likely and red means unlikely and that Premiere Pro may start dropping frames. Green means that section of the timeline has been rendered and playback will be realtime.

In the simplest terms, rendering previews is like exporting videos file that Premiere Pro can playback instead of the source media in your sequence. Preview settings can be changed in Sequence Settings, found under the Sequence menu. Premiere Pro manages preview files in the background, but you can select where they are save to under File > Project Settings > Scratch Disks. Be aware these files also eat up storage space, much more than media cache files. Learn more about Scratch Disks in Premiere Pro.
Premiere Pro lets users render previews based on a number of selections, like Work Area, Selection, or just Effects. These can be found under the Sequence menu. Learn more about rendering and previewing sequences in Premiere Pro.
If you render previews, we strongly recommend taking advantage of Premiere Pro's Smart Rendering capability. In short, Smart Rendering will "pass through" rendered previews during export, dramatically reducing export time. Essentially, it's rewrapping previews instead of encoding them all over. Smart rendering only works with certain formats, such as Apple ProRes or GoPro CineForm. Click here to learn more about Smart Rendering in Premiere Pro.
3. Lower Playback Resolution
If you are dropping frames during playback, especially when adding effects and color corrections, lowering the Playback Resolution is the best way to improve playback performance in Premiere Pro. The Playback Resolution settings are located under both the Source and Program monitors.

Playback can be reduced to 1/2, 1/4, 1/16, and so on, depending on the native size of your footage. Lowering the Playback resolution downsamples your footage to make playback easier. Playback Resolution does not affect the quality of your exports; it is only for improving playback in Premiere Pro.
Summary
If you just want the highlight version of Ian's video, watch the segment below. Ian recaps all the essential takeaways that will help boost performance in Premiere Pro.

Bropinion
This is a very helpful tutorial with several practical performance tips for Premiere Pro. We were just surprised that Ian did not include any warning about updating system software in the middle of editing projects. THIS IS NOT RECOMMENDED! All software updates should only be done between projects. The last thing you want is a system compatibility issue with Premiere Pro in the middle of an edit. Always update with caution.
Did this tutorial improve playback or editing performance in Premiere Pro for you? Which optimazation tip worked for you? Let us know below!

Learn How To Edit Stuff
Hosted by Ian Sansavera, Learn How To Edit Stuff is a YouTube channel for Premiere Pro, After Effects and Photoshop tutorials. There aren't many tutorial-makers who can match Ian's combination of charisma and expertise. Support him by following Learn How To Edit Stuff on YouTube.