Krazy Kool Kaleidoscopes in Premiere Pro
Learn how to create a kaleidoscope effect with the Mirror effect in Premiere Pro.
Mirror, mirror on the wall. What is the fairest NLE of all? Premiere Pro, of course! In this tutorial, Kyler Holland shows three examples of how to create a kaleidoscope with the multiple Mirror effects in Premiere Pro. Follow our guide to his tutorial because things are about to get trippy.

The Mirror Effect
Before creating the kaleidoscope effect, we need to understand the Mirror effect. Premiere Pro's Mirror effect is relatively simple. It only has two controls: Reflection Center and Reflection Angle. Kyler explains both with onscreen visuals.
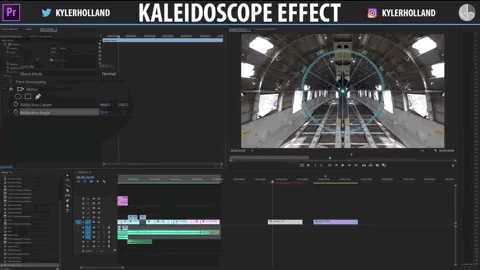
Learn the Reflection Center and Reflection Angle parameters of the Mirror effect in Premiere Pro. Via Kyler Holland
The Reflection Center is the point of reflection based on X,Y coordinates. For example, 960x540 is the center of a 1920x1080 clip. This is important later in the tutorial when Kyler adds multiple Mirror effects.
The Reflection Angle is the direction of the reflection. Stacking multiple Mirror effects in the Effect Controls panel mirrors all the previous effects. This is the basic workflow for creating a kaleidoscope effect.
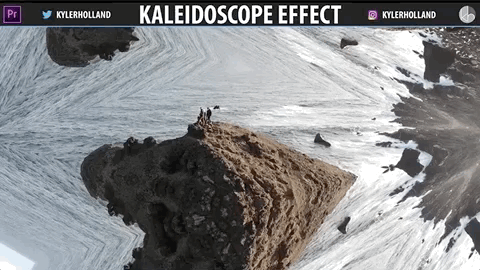
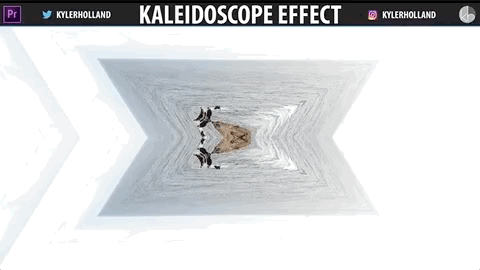
1. 1080HD Kaleidoscope Effect
In this tutorial, Kyler shares three kaleidoscope examples. The first kaleidoscope is used on a 1920x1080 HD clip. Watch the clip below to learn how to create a basic kaleidoscope effect.

Learn how to use Premiere Pro’s Mirror effect to create a basic kaleidoscope with HD footage. Via Kyler Holland
If you would like to try Kyler's first kaleidoscope example, you can copy his Mirror effects settings below:

Via Kyler Holland
Effect Hierarchy in the Effect Controls Panel
Effects in the Effect Controls are applied in order from top to bottom. For this kaleidoscope effect, it's critical to keep the original Mirror effect (960x540, 0.0°), or the "zero layer" as Kyler calls it, on the bottom the pile in the Effect Controls panel. It hides the black edges caused by the preceding Mirror effects. (Kyler demonstrates at the 3-minute mark.) This hierarchy is important to note because Premiere Pro will add new effects to the bottom of the stack by default. The same occurs when you copy and paste effects in the Effect Controls panel, as Kyler demonstrates. You will manually have to drag the original Mirror effect to the bottom, as shown below.

Via Kyler Holland
Save the Kaleidoscope Effect as a Preset
Once you're happy with the look of your kaleidoscope, you can save it as an effect preset. Just remember that the look of kaleidoscope depends heavily on the content of your shot. Nevertheless, it's easy to audition different kaleidoscope effects when they're saved as presets.

Learn how to save the kaleidoscope effect as a preset in Premiere Pro. Via Kyler Holland
2. 4K Kaleidoscope Effect
Kyler goes on to show how to create a kaleidoscope effect with 4K footage. For a 4K shot, the x,y coordinates are different than a 1920x1080 shot. To create the original or "zero layer" Mirro effect, set the Reflection Center to 1920x1080. (NOTE: Kyler uses a different method for this kaleidoscope that does not require the "zero layer".)
See how to create a kaleidoscope with 4K footage in Premiere Pro. Via Kyler Hollan
3. Duplicate and Resize the Kaleidoscope Effect
In his last kaleidoscope example, Kyler reveals that clips with kaleidoscope effects can be duplicated and resized above another. Just make sure the top clip is smaller so the clip on the bottom is visible. This creates additional kaleidoscope patterns and is also a good solution for eliminating black edges caused by mirror effects on the top clip. Remember the success of this technique also depends on the content of your clips.
See how clips with kaleidoscope effects can be duplicated and resized above another to create more patterns and to hide black edges. Via Kyler Holland
Bropinion
Kaleidoscopes have a magical, mystifying look. Often, they're difficult to fit into an edit because they're so visually extreme. But if you're working on a music video or a travel video, a kaleidoscope effect can definitely spice things up and recapture the attention of your viewers.
If you enjoyed this tutorial by Kyler Holland, be sure to look out for his Kaleidoscope preset pack which he announces at the end of the video.

Kyler Holland
Kyler Holland is a filmmaker with over 125,000 subscribers to his YouTube channel. Support Kyler by checking out his Premiere Pro presets on his Sellfy page. Join The YouTube Community on Facebook hosted by Kyler.