All tagged 2017-14

Justin Odisho: How to Scribble Animation Write-On Line Effects in Adobe Premiere Pro (No After Effects)

Learn how to create a Animated line or scribble trail right in Adobe Premiere Pro CC 2017 using the write on effect in this tutorial. —Justin Odisho

Add some visual candy to moving objects in your footage with the Write-on effect in Premiere Pro. Tutorial-master, Justin Odisho, shows how to animate simple scribble effects and motion trail-lines that follow the action in your shots.

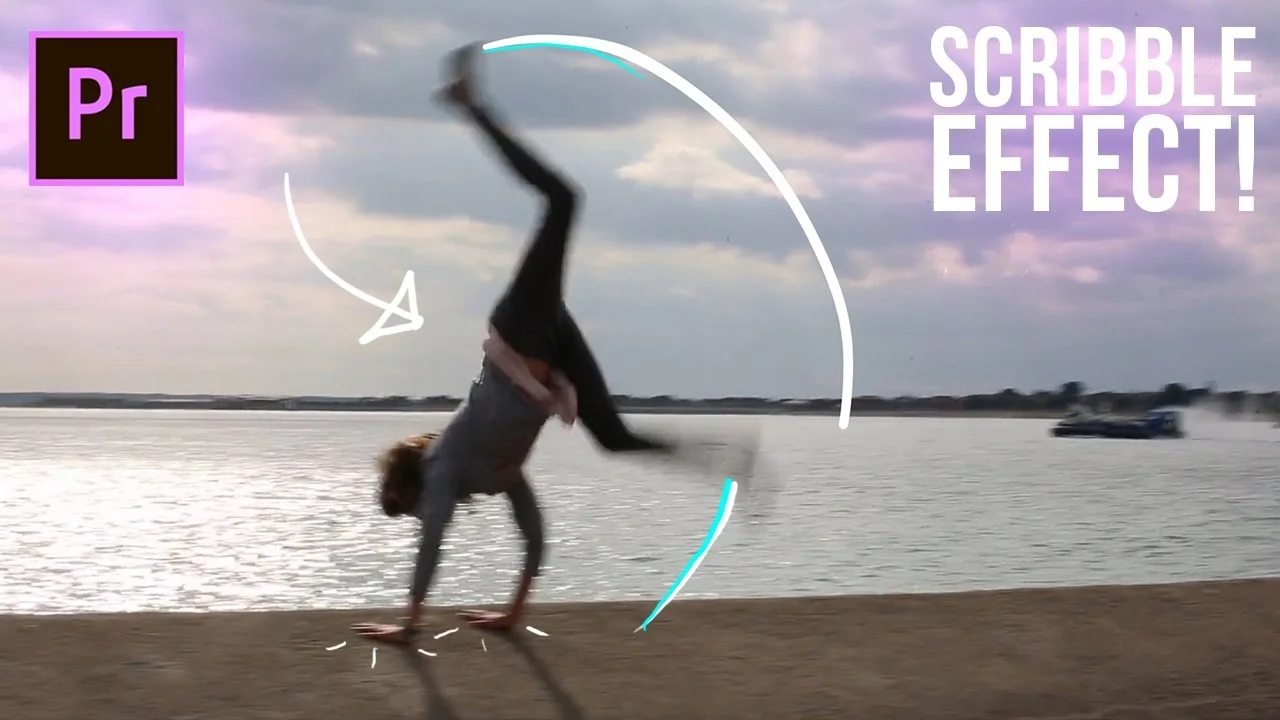
The first step is identifying shots that will work well with this effect. Look for objects or points that move through the frame. For example, in this tutorial Justin animates a stroke following the feet of a subject doing a cartwheel.

Next, apply the Write-on effect to your clip. Notice the small dot that appears in the middle of the screen. This is the first point of your stroke. Now it just needs some motion. Watch Justin at 1:02 begin to animate the stroke to follow the subject's feet by keyframing the Brush Position.

With all the keyframes set, Justin customizes the look of the stroke at 1:56. The Write-on effect in Premiere Pro lets you change the Color, Size, Hardness, Opacity and Length of the stroke. All of which can be animated as well. Let your creativity run wild!

Chung Dha: Easy Self-writing Text Tutorial in Adobe Premiere Pro

In this Tutorial video I am showing you in an easy method how to achieve the self-writing text effect inside of Adobe Premiere Pro, without needing to make a lot of titles and inside of Premiere Pro. There is no preset for this so just watch the video. —Chung Dha

Ever wonder how to make text "write-on" by itself? Did you know Premiere Pro has a Write-on effect? In this Premiere Pro tutorial, Chung Dha teaches how to animate the Write-on effect to reveal your text so it looks like it's writing on the screen.

First, create your text using the Title Designer in Premiere Pro. Script or handwritten fonts work particularly well with this technique. Then apply the Write-on effect to a Transparent Video clip above your text in the Timeline. 

Next, Chung makes some preliminary changes to the stroke length at 1:41. But starting at 2:10 Chung begins keyframing the path of the stroke that will reveal the text. He uses keyframe bezier handles to finesse the path around the curves of the text.

The next step is critical. At 4:36, Chung increases the Brush Size so that it covers all the text. This is important because any text outside the stroke will be visible before the write-on animation. 

Keyframing the path on the text is a time-consuming process that looks much faster when sped up in a tutorial. Power through! The reward of seeing your text write-on is well-worth it! 

Now for the magic. At 5:49, Chung applies the Track Matte Key effect to the Title clip, and selects the track with the Transparent Video clip as a Matte. Now the Write-on stroke animation reveals the Title. Alternatively, the Write-on effect has it's own Reveal Original Image Paint Style which does the same thing as the Track Matte Key.