All tagged 2017-04

Premiere Gal: 5 Premiere Pro Tutorials on Export Settings for Social Media

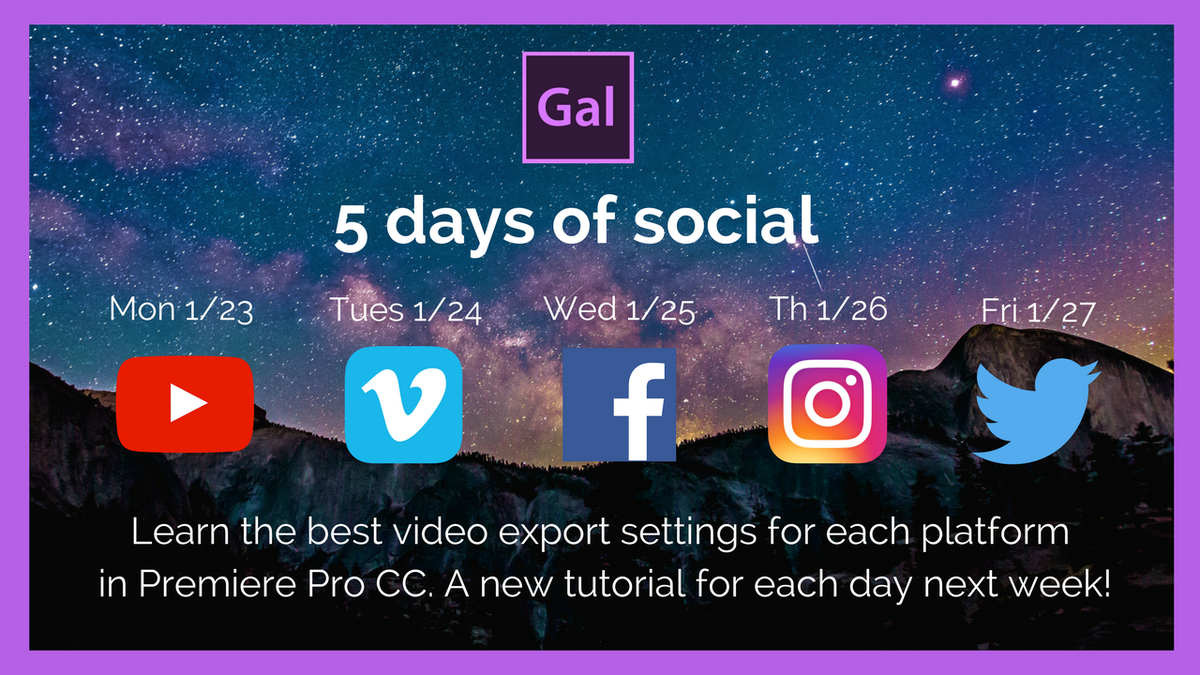
Learn how to export video from Premiere Pro to the top social media sites. Premiere Gal has just finished a week-long tutorial series on exporting and publishing videos from Premiere Pro to YouTube, Vimeo, Facebook, Instagram, and Twitter. Follow along as she shows how to create sequences, save them as presets, and upload them to the web using Premiere Pro's export presets and direct publishing. She also has a few custom export recipes and recommendations of her own! Continue reading to hear more from Premiere Gal!

I'll be uploading a new video tutorial each day of the week. Each video will demonstrate, in detail, the best video export settings in Premiere Pro for the following social media platforms: YouTube, Vimeo, Facebook, Instagram and Twitter. —Premiere Gal

Source: https://www.youtube.com/playlist?list=PLDZSBjKu8PgIUs6clYi7YDb5AMBcCxFMr

Orange83: Glowing Cateyes in Premiere Pro And More Tutorials

Introducing Orange83: Premiere Pro Tutorials, Microsoft Products, and More

Orange83 makes his debut on Premiere Bro in this "Glowing Cateyes" Premiere Pro tutorial. First step is having a cat. Next, Orange83 uses the Black & White effect, and then applies a Lumetri Color effect. In order to isolate the color to the eyes, you need to use a mask. At 1:33 Orange83 shows how to draw the mask and animate it so it sticks to the eyes. Continue reading from more Orange 83 tutorials!

This is a quick (3 minutes!) tutorial on creating glowing cat eyes. In this video I will teach you which effects to apply, how to do some color correction and also how to make a mask overlay. —Orange83

Source: https://youtu.be/4hFmdV1I_ow

Justin Odisho: Flashing Invert Color Effect Adobe Premiere Pro

Perfect for music videos and crime scenes, Justin Odisho shows how to create an invert flash effect in Premiere Pro. First apply the Invert effect, and then at 1:28 watch Justin show how to keyframe both the Blend with Original and Channel settings to create flashes in your footage. Don't forget, you can save your invert flash effect as a preset and apply it to other clips. Learn how: HOW TO CREATE, MODIFY, SHARE, AND ORGANIZE EFFECT PRESETS IN PREMIERE PRO.

In this Adobe Premiere Pro CC 2017 Tutorial, I will demonstrate how to invert channel colors and use keyframes to create a rotating flash color effect. —Justin Odisho

Source: https://youtu.be/UisUjXvDPeY

Livia's Projects: How to Sync Video & Audio in Adobe Premiere Pro

Are you a fan of those travel and video tutorial YouTube channels? New on the scene is Livia of Livia's Projects. In this tutorial, Livia shows her workflow for syncing video and audio in Premiere Pro. Also, check out her recommended 5 Steps To Make Your First YouTube Video in Premiere Pro. In addition to creating tutorials on her YouTube channel, Livia is also posting Premiere Pro tips on her Twitter and Facebook page

This video is a tutorial and I'm showing you how you can easily synchronize your audio and video in Adobe Premiere Pro CC. —Livia's Projects

Source: https://youtu.be/oydxZrLv2V0

Make Better Video: Free Adobe Premiere Pro Tutorials

Introducing Make Better Video, a new Adobe Premiere Pro, After Effects and Photoshop tutorial series by legendary VFX artist, Sean Mullen of Rampant DesignMake Better Video tutorials teach at high level of technical proficiency that only comes from a host with a lot of experience. More than that, Sean gives practical and real-world scenarios where his Premiere Pro techniques can be used. When asked what sparked Make Better Video, Sean said, "Trying to give back to the community any way we can." Continue reading for more Make Better Video tutorials!

Free Adobe Premiere Pro, Adobe After Effects and Adobe Photoshop tutorials hosted by Visual Effects Artist Sean Mullen. —Make Better Video

Source: MakeBetterVideo.net

Adobe Premiere Pro at Sundance 2017

Sundance 2017 Premiere Pro Highlights

Sundance Film Festival saw an 81% increase in projects that were made with Adobe tools. That includes 97 films (out of 200) edited in Premiere Pro. In this post, you'll find some Premiere Pro highlights from Sundance 2017.

Justin Odisho: How to Add a Timecode Stamp or Timer to your Footage in Premiere Pro

Do you have a video that needs an onscreen timer? Learn how to add "burnt in" timecode to your video in this Premiere Pro tutorial by Justin Odisho. Apply the Timecode effect directly to your video clip, or to an adjustment layer above multiple clips. At 1:29 Justin covers the differences between the Timecode Source settings. You can also add also burnt in timecode on export under the Effects tab in the Export Settings window. You can save your timecode effect settings as an export preset as well.

In this adobe Premiere Pro CC Tutorial, I will show you how to add a Timecode signal or timer stamp effect on your videos or footage. —Justin Odisho

Source: https://youtu.be/KPE01kr6AVM

Justin Odisho: How to Sync Cut Footage to Music in Adobe Premiere Pro CC

Learn how to edit your video to the rhythm of a music track in this Premiere Pro tutorial by Justin Odisho. First, at 1:15 Justin identifies beats in the audio waveform, and then cuts his video clips to sync using the razor tool. (You can also lock the music track and use keyboard shortcuts Q and W to Ripple Trim Edit to Playhead.) Alternatively, BeatEdit for Premiere Pro by Mamoworld will analyze your music track and add markers to beats. Then, with Snapping (S) enabled, you can easily edit your footage to the markers with 100% precision. At 2:27 Justin suggests using onscreen text and fades to stylize your syncopated edits.

In this video editing tutorial, I will be using Adobe Premiere pro CC 2017 to demonstrate how to Sync Jump Cut your footage with music to create a more cinematic feeling sequence or transition from clip to clip and set the pace of your project! —Justin Odisho

Source: https://youtu.be/-2eXk0oLFQs

Christian Maté Grab: Fake Camera Movements in Adobe Premiere Pro

Learn how to reframe and add movement to your shots in this visually dramatic Premiere Pro tutorial from Christian Maté Grab. Christian uses 4K footage but your footage doesn't have to be 4K. (It definitely doesn't hurt either!) As Christian explains at 0:50, the trick is having footage that is larger than your sequence size, giving you the extra resolution to animate the image without any quality loss. With more and more cameras offering 4K (including mobile devices!) this is an lesson for creating faux camera movements or angles in Premiere Pro.

How to Fake Camera Movements in Adobe Premiere Pro (Tutorial) In this Tutorial I'm gonna show you a great and easy technique to fake camera movements in post with the help of Adobe Premiere Pro and Keyframes without any third-party-plugins. —Christian Maté Grab

Source: https://youtu.be/a0rLrR0TgkQ

Learn How To Edit Stuff: How To Color Correct In Premiere CC

In a very bold tutorial, Ian Sans of Learn How To Edit Stuff shows off his best practices for color grading in Premiere ProAt 2:03, Ian begins his journey through the Lumetri Color panel, starting with the Basic Correction tab and going all the way through Vignette. While balancing the shot, Ian makes it clear that color grading is subjective, but if you want to be more "scientific", he suggests using the Waveform Lumetri Scope at 4:27. Ian skips the Creative tab and comes back to it at 12:57, and recommends applying Creative tab adjustments to an adjustment layer. 

This week, let's learn how to color correct in Premiere! It's not necessarily easy... but it's easily necessary. —Learn How To Edit Stuff

Source: https://youtu.be/2kDtD32JpI8

VideoRevealed: Exporting EDLs from Adobe Premiere Pro

You won't run into EDLs very often these days. But in case you do, here's a Premiere Pro tutorial to guide you. EDL stands for Edit Decision List, and Colin Smith of VideoRevealed shows how to export an EDL out of Premiere Pro. EDLs are primarily used for handing off an edit to finishing house or colorist. The problem is EDLs are very limited, as Colin explains starting at 1:07. You have to account for these limitations before you begin your assembly. At 3:10 Colin begins diving into the actual EDL export settings.

This is another requested tutorial on how to export an EDL (Edit Decision List) out of any Premiere Pro Timeline. With EDLs only supporting a single video track and four audio tracks, you have to plan how your edit will be setup to export correctly. —VideoRevealed

Source: https://youtu.be/rrezCN9mwBQ

Justin Odisho: Earthquake Camera Shake Transition Effect in Adobe Premiere Pro CC

Shake up your edit with this earthquake/camera shake transition tutorial from Justin Odisho. In this video, he will show you how to use the Directional Blur effect in Premiere Pro to hide a cut from one clip to another. As Justin says at 1:40, the key to is using an adjustment layer to animate the effect across edit points. He also uses footage that was shot with quite a bit of shake, which makes this transition style very appropriate.

In this Adobe Premiere Pro CC 2017 Tutorial, I will demonstrate how to create an earthquake or camera shake transition effect using directional blur, keyframes, and adjustment layers! —Justin Odisho

Source: https://youtu.be/qphYgxfr7ng