Premiere Pro Transitions with Impact

FilmImpact.net’s New Transition Pack 4 for Premiere Pro is the Best Bang for Your Buck.
[Sponsored Post]
Transitions are the rage. Premiere Pro users are looking for transitions all over the web, especially free ones. More than half of the Premiere Pro tutorials we curate from YouTube are about creating transitions. Case in point, you’re probably reading this because you’re looking for inspiration for your transitions. Or, perhaps, a freebie. Either way, you’ve come to the right place!
In this post, we look at the new Transition Pack 4 from FilmImpact.net, and how these professional and affordable transitions can impact your edit points. Make sure you read to the end for a limited-time FilmImpact.net discount, and information on how to get 5 free FilmImpact.net transitions!
“The Best Video Transitions for Adobe Premiere Pro”
FilmImpact.net develops beautiful, easy-to-use transitions specifically for Premiere Pro. They have several Transition Packs, as well as Bounce Pack, intended for creating energetic text animations. Motion Tween by FilmImpact.net is an unrivaled plugin that allows users to easily animate graphics with motion blur… without keyframes!
FilmImpact.net transitions are actual transitions, as opposed to overlays, effects, or effect presets. They can be applied to edit points, just like the native transitions in Premiere Pro. But unlike the native transitions, which have very few options for customization, FilmImpact.net transitions have lots of intuitive properties.
The versatility of FilmImpact.net video transitions is incredible! They work with video, stills, and graphics, such as titles, logos, lower thirds, etc. Additionally, FilmImpact.net transitions can be applied to HDR footage without cutting off color information.
Using FilmImpact.net Transitions in Premiere Pro
Apply FilmImpact.net transitions the same way you would the native transitions in Premiere Pro. Drag them from the Effects panel onto your edit points. It’s as simple as that!
Adjust the timing of the transition directly in the Timeline. No need to mess with keyframes or clip lengths; grab the transition and just slide it left or right. Double click the transition to enter a new duration.
Did we mention FilmImpact.net’s default transitions are fantastic! Out of the box, they’re some of the best transitions on the market. Once you’ve gotten over the defaults, you can jump into the familiar Effect Controls panel to take advantage of FilmImpact.net’s intuitive settings.

Transition Pack 4
Transition Pack 4 is our latest set of video transitions for Adobe Premiere Pro CC. It contains ten compelling video transitions. These are all GPU accelerated for high performance.
FilmImpact.net recently released their latest pack: Transition Pack 4, featuring ten superior transitions for your everyday use. Don’t let the generic name fool you. Any descriptive title would likely misrepresent all these transitions have to offer. They’re universally applicable to any Premiere Pro user. If you have an edit point in your sequence, then Transition Pack 4 is for you.
Before we take a look at the specific transitions in Transition Pack 4, here are three important settings nearly all of them have in common:
- Transition Timing - Customize the start and end of the transition animation. (Most of the time you will probably leave this on the default 0 and 100.)
- Seed - Creates computer-generated variations based on the seed number. These are stored and can be recalled by entering a previous seed number.
- Edge Behavior - Most of the transitions involve scale or rotation animation. Edge Behavior determines how clip edges should be extended. Options include: Mirrored Repeat, Repeat, Repeat Edge Pixel, Checkerboard, and Transparent.
- Motion Blur - Enable, disable, and increase or decrease the amount of motion blur. (Which looks amazing in these transitions!)
Let’s take a close look at each of the transitions in Transition Pack 4. There is a brief video example and description, followed by explanations of some important key settings. We also include several tips directly from Jaap Boerhof, the founder of FilmImpact.net, on how to use some of these transitions.
NOTE: In the following transition descriptions, outgoing clips are designated as “clip A” and the incoming clips are designated as “clip B.”
Impact Flicker
Impact Flicker rapidly intercuts between clip A and clip B, as seen in many popular music videos and film trailers. This transition eliminates the tedious process of creating flicker effects with the razor tool. It also allows for much more control and flexibility over the creative styling of the flicker.

- Position Offset - Animate the offset of clip A and B over the course of the transition. You could use this to create something like a film roll transition.
- Scale, Rotation, Anchor - Animate the motion properties of both clip A and B. When rotating the clip, the edges of the clip obey the Edge Behavior setting, set to Mirrored Repeat by default. Also note, you can scale the X and Y values independently to create some stretching effects.
- Colorize - Create an overlay of color on the footage. This gives the appearance of a light leak. Customize the Color with the Color Picker.
- Hue Variation - Randomizes the Colorize hue.
- Grain, Vertical and Horizontal Scan Lines - Add film and video damage to imitate the look of a bad TV or VHS transition.
- Keep Count - Uncheck if you want the count of flickers to fill the duration of the transition. Otherwise, you can customize the number of flickers with the Count-Setting. A count is equal to one strobe of clip A and clip B.
- Strobe - Adjusts the number of frames for each part of a count. For example, a strobe of 2 will remain on clip A for 2 frames and then clip B for 2 frames.
Impact Grunge
Impact Grunge has the grittiest look in Transition Pack 4. It would seriously take a lot of time to recreate this transition in After Effects, and it probably wouldn’t end up this cool. Impact Grunge works extremely well for disorienting edits, without any need for much customization.

- Wiggle - Adjust the intensity of the wiggle. Give Impact Grunge more movement to make it feel even more jarring. You can also customize the direction and the size of the wiggle.
- Dirt, Scratches - Add more dirt and scratches by increasing these values.
- Colorize - Tint your grunge with a little bit of color.
- Strobe - Add “steps” in the animation curve of the grunge transition. For example, a strobe of 2 will repeat the amount of grunge 2 frames before changing.
Impact Kaleido
Easily the most stylistic transition in the pack. There’s nothing subtle about a kaleidoscope. It’s supposed to make the viewer stop and say, “ooh pretty colors.” But even this can have a contextual value of your video projects. Use it in a music video or drug-induced hallucination.

- Pieces - Change the number of kaleidoscopic instances from 8 to 28. We assume your eyes would just explode beyond 30.
- Zoom - Change the amount of zoom on the kaleidoscope pattern. By default, this is set high in order to see a lot of the pattern. Eliminating the zoom can create some interesting transitions as well.
- Inner Zoom, Rotation - Adjust the zoom and rotation within the clip independently of the overall kaleidoscope.
- Wipe Angle, Feather, Time - It’s difficult to articulate exactly what these settings control, but they change the appearance of the inner circles of the kaleidoscope. Experiment with these settings to create different patterns based on your footage.
- Movement - Adjust or turn off movement on the kaleidoscope pattern.
Impact Lens Blur
One of the more simple transitions in terms of the visual result. You will be won over by the smoothness of Impact Lens Blur compared to the native dissolves and blurs in Premiere Pro.
JAAP: Impact Lens Blur is a beautiful soft blur dissolve that emulates lens blurs created by real cameras.

- Iris Edges, Roundness, Diffraction Fringe, Gain - All of these settings can be customized to achieve different blur characteristics found in actual lenses.
- RGB Split - Give Impact Lens Blur some style by separating the red, green, and blue channels. The results are relatively subtle, but the RGB can best be seen around lines with hard contrast in your footage.
Impact Page Peel
Give Impact Page Peel a chance before you disregard it as cheesy. It’s nothing like the native Page Peel in Premiere Pro. Impact Page Peel gives your video the feel of actual paper being folded over and revealing the next page of the story. Just like when you’re mother used to read to you.
JAAP: Impact Page Peel is great for revealing logos.

- Mode - Reverse the page peel under the Mode menu.
- Radius, Angle, Animate Angle - Modify the direction and curve of the page. Radius will increase/decrease with the amount of curvature. Angle is the angle of the page, and Animate Angle is the direction of the peel. The page peel will begin at the Angle and add the Animate Angle.
- Lighting - Add realism to the curve of the page peel with a simple lighting effect. Think of it as a reflection on some glossy paper. The more intense the lighting, the more distinguished the page looks against the background clip. You cannot change the color of the lighting, and it is not affected by the Colorize setting.
- Shadow - Create a drop shadow for the page peel. The shadow distance and softness are fixed.
- Back Side - Choose between the Incoming Clip or Outgoing Clip for the back side of peeling page.
Impact Plateau Wipe
Impact Plateau Wipe combines the feel of a Luma or Gradient Wipe with the subtlety of a fade, plus a pinch of zoom. It’s a delicious recipe for the most seamless transition in Transition Pack 4. It’s one of our favorites in the bunch.

- Lift Clip A/B - Control the amount of zoom on each clip. We recommend having some zoom movement because it’s what really makes this transition unique. It puts the “plateau” in Impact Plateau Wipe.
- Angle, Animate Angle - Angle is the starting angle of the wipe, and Animate Angle will rotate the wipe as it transitions to the next clip. Consider adjusting the angle to reveal the subject of clip B immediately, as opposed to starting on some meaningless space in the image. This will engage the viewer’s eye directly at the beginning of the transition.
- Colorize - Give the Wipe Feather some color to further blend with the background of your clips.
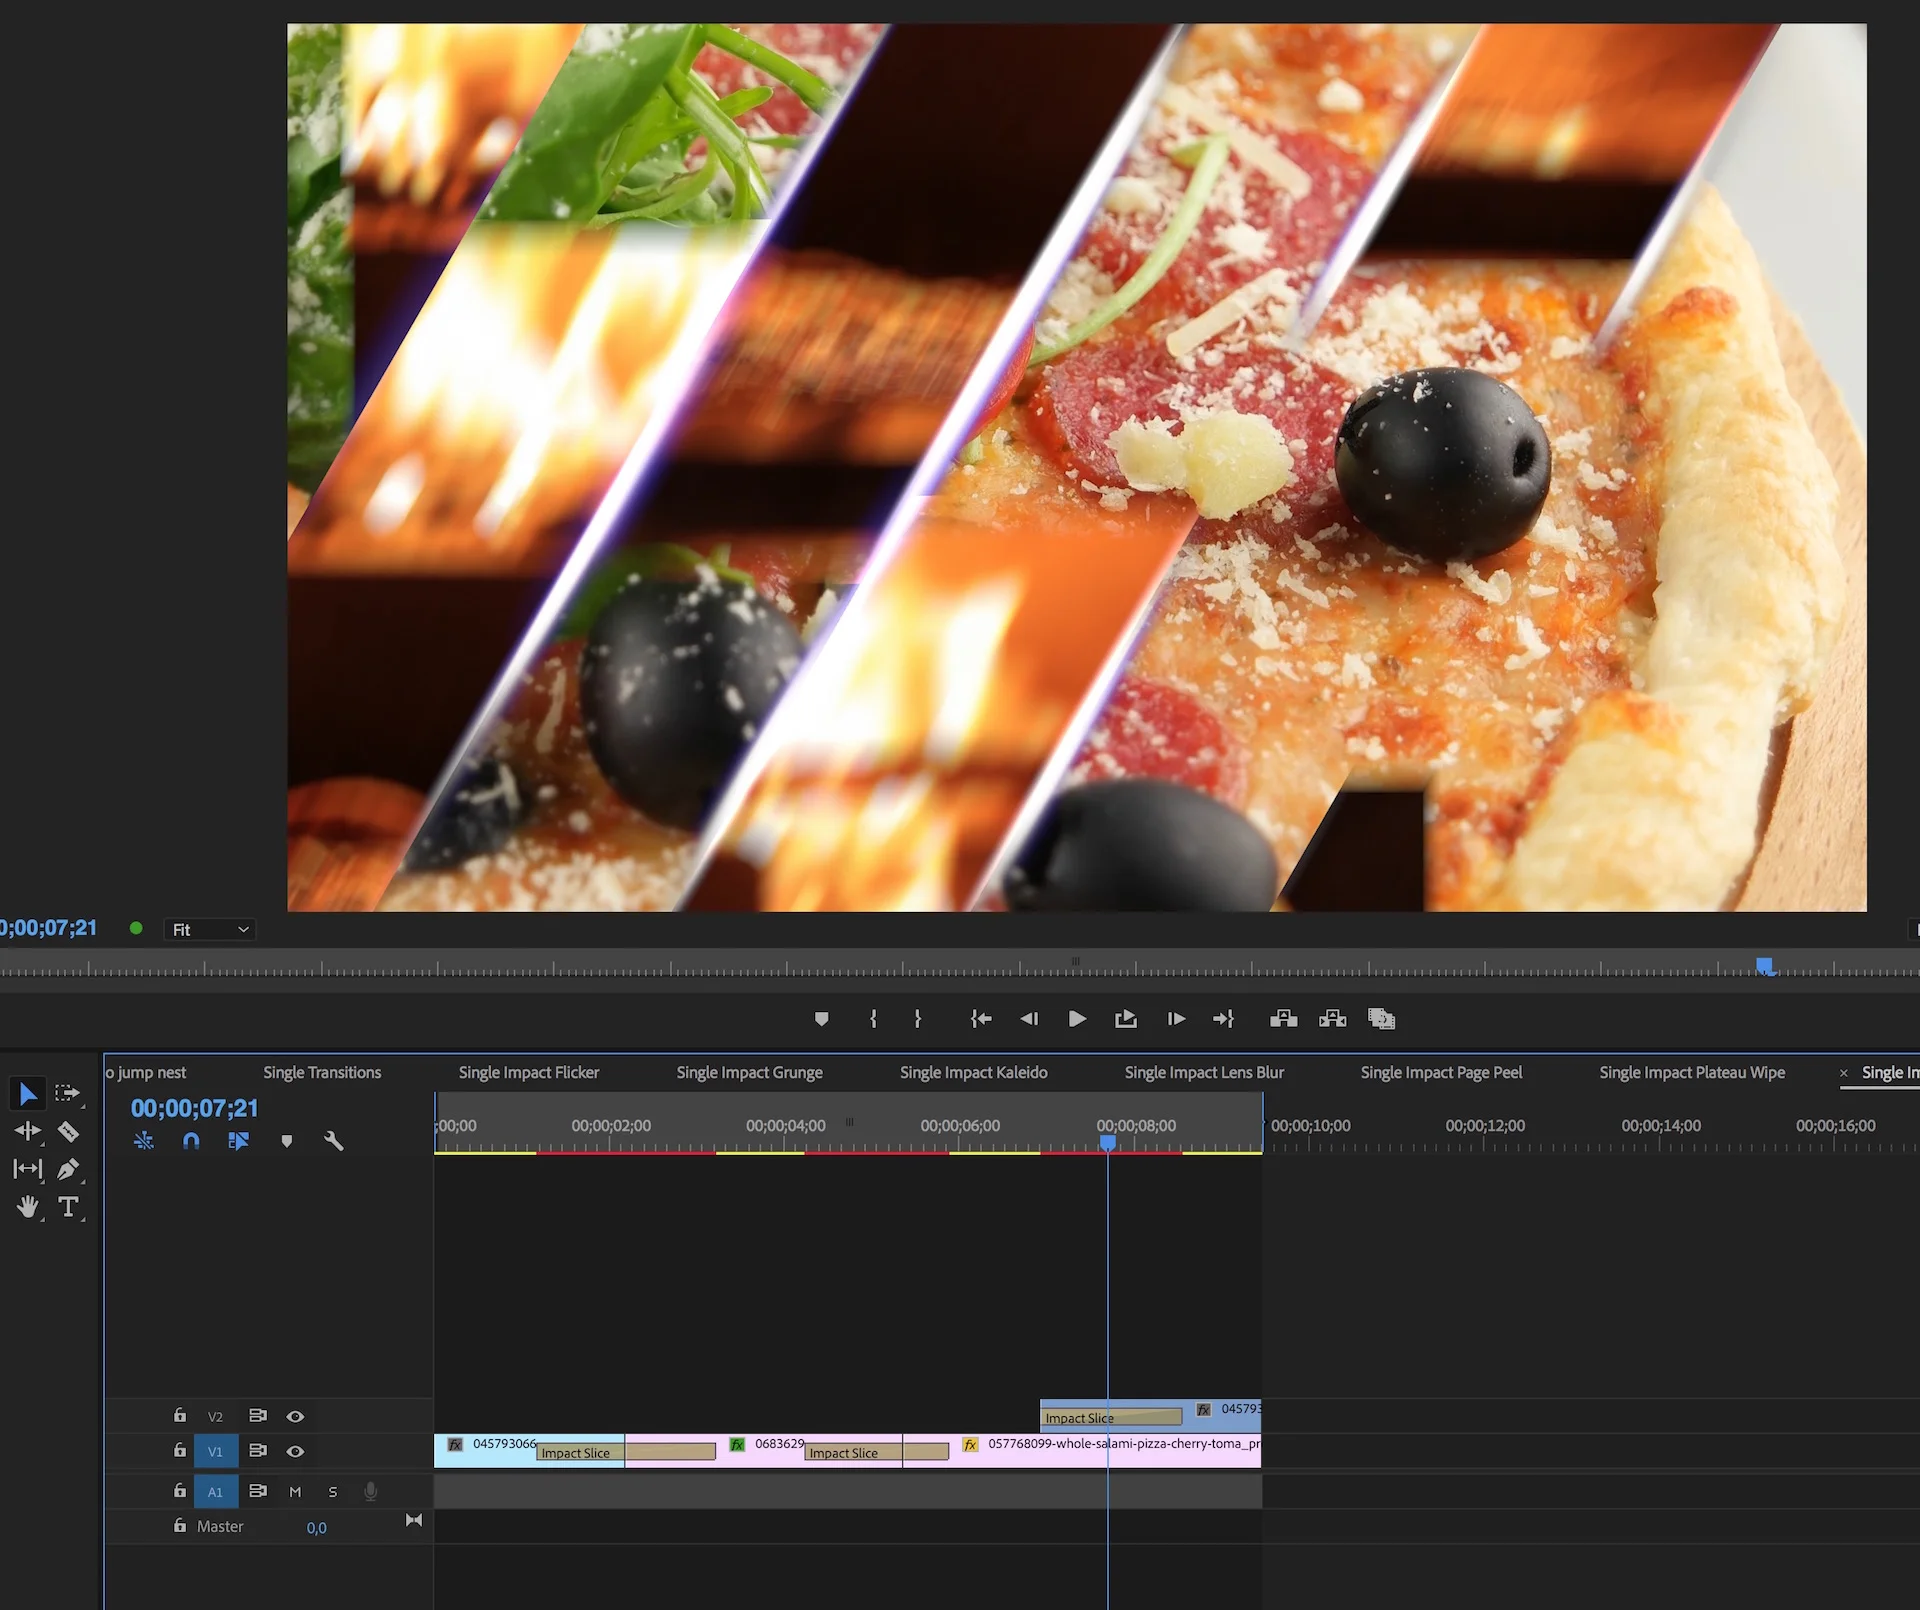
Impact Slice
Unlike the seamlessness of Impact Plateau Wipe, Impact Slice is all about seams. It cuts up your footage into evenly spaced segments, and then push-reveals clip B. In order to slide-reveal clip B, leaving clip A in place, add the transition to a layer above clip A. (See example below.)

- Slices - Increase or decrease the number of slices in the transition. The max number of is 32.
- Delay - By default the slices animate sequentially, one after the other. Make the slices animate simultaneously by reducing the Delay to 0.
- Burn Amount, Width, Tint, White - Adjust or remove the burn between slices. By default, the Burn Amount is set to the max at 100. The Width can be increased up 100 as well. Reducing the White will remove the inner white glow, leaving you with just the color of the burn. For a cleaner look, lower the Burn Amount.
Impact Split
Impact Split is a fantastic transition for introducing the subject of clip B before revealing the entire frame. The split partially opens, then stops before completing the transition. There’s also some subtle zooming and pushing happening on clip A. It’s a modern take on an otherwise very linear split transition.

- Easy Ease, Stop, Drive - Adjust the path of the Curve Graph. Easy Ease controls the amount of easing into the Stop. You can modify where the Stop happens during the transition. Drive controls the duration of the Stop; the more Drive, the less time on the Stop.
- Mode - Switch the split animation from open to close.
- Angle, Split Point - Adjust the position and angle of the split. Use these controls - along with Easy Ease, Stop, and Drive - to reveal the subject of the incoming clip.
- Push - Choose how much the split pushes clip A. At 100% push, no part of clip A is covered by clip B, but at 0 the split animates on top of clip A.
- Zoom - Increase or decrease the amount of zoom on clip A during the split animation. Zoom is set at 200 by default. Maximum zoom is 400.
Impact Stretch Wipe
Impact Stretch Wipe is very basic in terms of customization, but visually there’s hardly any need for additional controls. It has a very seamless look due to the fact the seam is literally being stretched beyond recognition. Impact Stretch Wipe works well as a scene transition. Of course, that could be true of any of these transitions, but the stretch effect really amplifies the perception of moving to a new place and time.
JAAP: Impact Stretch Wipe works really well with both video and text.

- Angle - Adjust the angle of the wipe. Compliment the composition of your shots by matching the angle to parallel or perpendicular lines in your footage.
- Stretch - Adjust the amount of stretch. At the maximum of 100, the stretch covers the entire frame before transitioning to the clip B. Turning off Motion Blur gives this transition a very different look.
- Exposure - Increase or decrease the intensity of the brightness of the stretched pixels.
Impact Warp
Impact Warp is, perhaps, the most powerful transition in Transition Pack 4. It achieves all the variations of the popular zoom and rotate transitions seen in YouTube travel vlogs, within a single transition. No more having to create zooms with Replicate, Mirror, and Transform effects; Impact Warp does it all!
JAAP: Impact Warp is amazing for creating seamless video transitions.

- Type - Select the animation style: Bezier (default), Overshoot, or Bounce. Bezier moves smoothly from clip A to clip B. Overshoot moves past clip B before snapping back. Bounce lands on clip B with some bounces. The Curve Graph controls change depending on the selected Type, many of them self-explanatory. If you’re confused, experiment with the settings and see how they affect the Curve Graph.
- Surprise Me - Randomly generate Impact Warp transitions. Literally, tap into the power of this transition by clicking the Surprise Me button till you find a result you’re happy with. In some cases, we found the Surprise Me results to be too much, but it was only a couple more clicks before we found something we liked. Use CMD+Z (Control+Z for Windows) to revert back to previously generated surprises.
- Continuous, Temporal Motion Controls - This is the most complex part of all the Transition Pack 4 transitions. To best explain this, we asked Jaap to provide examples for each:
Continuous Motion Controls:
JAAP: Continuous rotation with a 90-degree angle will rotate clip A from it's initial 0 degrees to 90 degrees, Clip B will rotate in the same direction from -90 to its final 0 degrees position. This means both clips are moving in the same direction, creating a continuous movement.
Temporal Motion Controls:
JAAP: Temporal rotation with a 45-degree angle will begin the rotation at 0 degrees, then rotate both clips A and B to 45 degrees, and finally return back to 0 degrees. So, Temporal Motion Controls create movements going back and forth.
- Edge Behavior - This setting is very important because any zoom or rotation with Impact Warp will reveal clip edges. In most cases, the default Mirrored Repeat is going to give you the most seamless results. But that’s not to say the other options wouldn’t give you better stylistic results. Changing to Edge Behavior to Transparent is a great way to create an elegant photo slideshow.
Saving Time: 2 Examples
FilmImpact.net’s Transition Pack 4 will save you time (a.k.a. money) without sacrificing any quality. Here’s our proof: two transitions manually created with native effects in Premiere Pro vs FilmImpact.net transitions. You be the judge.
Lens Blur with RGB Split
We created a blur dissolve using the Gaussian Blur effect on an adjustment layer. For the RGB split, we used the method of three duplicated clips, one for each RGB color channel. Note the effect keyframes on the left.

With Impact Lens Blur we kept the default blur settings and increased the RGB split to the max. The results were far superior, and the RGB split property in Impact Lens Blur saved a lot of time and didn’t clutter the Timeline with adjustment layers.
Zoom with Rotation
This transition required one Replicate and four Mirror effects to extend the clip boundaries so the edges of the clip aren’t seen during the zoom. The Transform effect must be used on an adjustment layer to animate the zoom across the edit point. Even with effect presets, this transition was tedious, especially when adjusting rotation and position of the zoom. Note the Replicate and Mirror effects, as well as the Transform keyframes on the left.

Using Impact Warp, we clicked the Surprise Me button till we found something we liked. We could have easily dialed in a basic zoom and rotate animation, but who doesn’t like a little surprise?
Special Discount and Free Transitions
We’ve shown specifically how the Transition Pack 4 by FilmImpact.net can save you time. But what good is that if the price point is hundreds of dollars? Well, it’s not! Transition Pack 4 goes for a modest $99. That’s only $10 a transition! That’s a lifetime of “Surprise Me” Impact Warp transitions for the cost of a burger! And that’s without our exclusive discount. Enter promo code PREMIEREBRO for 10% off Transition Pack 4. Valid till September 1st, 2018.
If you would like to get some FilmImpact.net transitions for free, download Transition Pack 1, and use Impact Dissolve, Impact Flash, Impact Push, Impact Roll, and Impact Blur to Color watermark free!
We honestly can’t recommend FilmImpact.net enough. The quality and ease-of-use of their transitions for the price is unbeatable.
What are your thoughts on Transition Pack 4 by FilmImpact.net? Do you already use FilmImpact.net transitions? We would love to hear from you! Please share how you use them in your projects.