10 Premiere Pro Tips From Adobe Video World 2015

Practical Premiere Pro Tips You Can Start Using Right Now!
Writing about Adobe Video World 2015 is like reviewing a good meal; you have to thin-slice it in order to taste the juicy parts. It would be easier to present a high-level description of the event or a broad summary of the sessions. But many editors attend events like Adobe Video World for one reason: free beer. Kidding. Editors want to learn practical editing techniques, something they didn’t know before, something they can use when they go back to their edit caves. So, here are 10 practical Premiere Pro tips from Adobe Video World 2015 that you can start using right now.

NOTE: The following tips are accompanied with live Tweets to give credit to the Adobe trainers and to promote social engagement. For more Adobe Video World resources and reviews, check out the links at the bottom of the post.
1. Assign Shortcuts For Track Height Presets
Think of track height presets as workspaces for your timeline. Click the Timeline Display Settings wrench in the timeline panel and select Save Preset. Give your preset a name and assign it to one of the track height keyboard shortcuts. Note, these shortcuts are not assigned by default. Track height presets are especially helpful for editing a series of content when track layout is consistent. Assign a preset to expand the tracks being worked on in each phase of the edit.
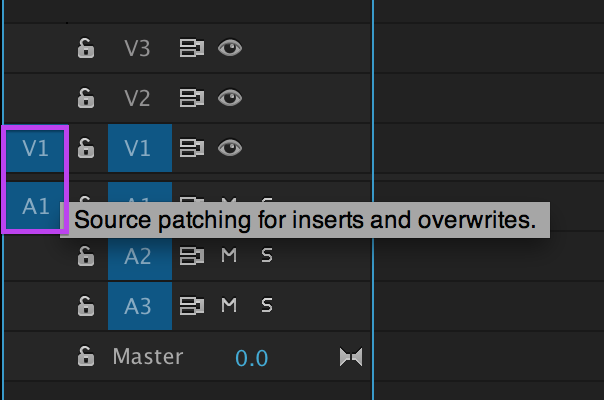
2. Assign Shortcuts For Timeline Source Assignment Presets
This is an essential tip for successful keyboard-driven editing. Toggling Source Assignments in the timeline will allow you to insert and overwrite clips to specific track. Also referred to as source patching, this can easily be confused with editing clips on the timeline using Track Targeting. (These should also be assigned keyboard shortcuts!) Source patching is especially useful when pulling selects from the Source monitor for a stringout and you want to organize the video and audio by track.
3. "Nest Or Not" Button
Knowing this feature really unleashes the power of nested sequences. For editors not using nested sequences, this may alleviate such fears as, “What if I want to go back back to my original clips?” Or, “What if I forget what’s going on in my nested sequence?” With the “Insert and overwrite sequences as nests or individual clips”, more commonly referred to as “Nest or not”, sequences will come into your sequence as a nest or with all the clips visible. Now you can nest to your heart’s content, knowing you can revert back and forth. Remember, you can load nested sequences in the Source panel, add in and out points and edit them into the timeline using Nest or not!
4. Switch Audio Transition Duration To Frames
Ever apply a 1 second audio transition to an edit and get some weird duration? Set your default audio transition duration to frames instead of seconds. It’s simple: your video transitions are in frames, why not set your audio transitions to match?
5. SHIFT+K Play Around Playhead
There are times when you just want to step back and preview an edit without having to drag the playhead, tap the arrow keys or loop in Trim mode. The beauty of Shift+K is it will play around the playhead only 1 time, honoring your pre and post roll preferences. The shortcut Shift+K is easy to remember when associated with the shuttle functions of J, K, L, but mapping Play Around to Opt+Spacebar might make more sense for some.

6. Copy/Paste Between Premiere Pro And After Effects
You are thinking, “Wait, what about Dynamic Link?” This method of copy and paste does not replace the realtime preview of Dynamic Link between Premiere Pro and After Effects. It is just a faster way of moving media between the two applications. A good rule of thumb for copying and pasting between Premiere Pro and After Effects is project to project and sequence to comp. Clip effects such as Position, Rotation, Scale, and Opacity are preserved when copying and pasting, but other visual effects are not. This is an example where Dynamic Link would be applied.
7. Add Master Clip Effects To Adjustment Layers
Just like any video clip, you can open an adjustment layer in the Source monitor and apply Master clip effects. This works great for color correction! If you know you are going to have repeated instances of a look, apply a Master clip effect to an adjustment layer and drag it out of the Project panel whenever you need. Another idea is to save a Premiere Pro project with your customized adjustment layers already made!
8. Add Metadata To Multiple Selected Clips
Every editor knows that adding metadata can be time consuming. This tip changes that. You can add metadata to multiple selected clips within the Metadata panel. Use the Assembly workspace (or create your own) with this workflow in mind!
9. Multiple Clips In Source Monitor
Did you know you can drop a bin on the Source Monitor and tab through the clips with the Source Monitor keyboard shortcut (Shift+2)? This is a smooth way to audition takes to a client. You can also add in and out points and make Subclips without having to leave the Source Monitor. (Apologies for the ugly GIF. I tried kicking the computer.)
10. Submit Premiere Pro Feature Requests / Bug Reports
There 3 ways in particular to submit Premiere Pro feature requests: the feature request/bug report form, the Premiere Pro community forum, and the Premiere Pro Facebook page. Obviously, the feature request/bug report form is the official submission policy but the Premiere Pro team does monitor the forum and Facebook page. Premiere Pro is product and, just like every other business, Adobe must prioritize features that will do the most good for the most customers, while balancing new innovation. When it comes to user feedback, the key is volume, the more voices requesting a specific feature, the more likely they will be heard. So be inspired to lead a feature request campaign and take ownership in the future direction of Premiere Pro! The Premiere Pro engineering team is made of real people and they will respond to feedback that is persistent, positive, and passionate. ore on this in a future Premiere Bro post.

Adobe Video World 2015 Resources
- For daily Premiere Pro World 2015 recaps, including exclusive Periscope interviews with Adobe employees and trainers, visit Adobe Video World 2015 Periscope Broadcasts.
- For more background on Premiere Bro at AVW 2015 visit Premiere Bro Goes to Adobe Video World.
- Check out Matt Christensen's blog for daily reviews of Premiere Pro World 2015. Click here for Day 1 at AVW.
- For more information about Adobe Video World visit adobevideoworld.com.

